From Signatures to Smarts: A Practical Guide to Upgrading Your IDS with AI and Autonomous Agents
Introduction
Traditional intrusion detection systems (IDS) have long relied on signature-based methods, matching network traffic against known attack patterns. But as threats evolve, that approach falls short. Enter machine learning and agentic AI, which shift the question from "Does this match a known pattern?" to "Does this actually make sense in context?". This guide walks you through transforming your IDS from a static rule-checker into an adaptive, intelligent security system using SnortML and autonomous agents. By the end, you'll have a practical roadmap to implement context-aware detection and automated response, reducing false positives while catching novel attacks.
Let's start by gathering what you need.
What You Need
- Hardware: A dedicated server or VM with at least 4 CPU cores, 16 GB RAM, and 100 GB SSD storage (more for high traffic). GPU optional but recommended for ML training.
- Software: Linux (Ubuntu 22.04 or later), Snort 3.x, Python 3.8+, TensorFlow or PyTorch, SnortML plugin, and an agent orchestration framework (e.g., LangChain, AutoGen).
- Data: A labeled dataset of normal and malicious traffic (e.g., CICIDS2017, custom captures). Provide 50 GB of pcap files for training.
- Knowledge: Familiarity with network protocols, basic IDS configuration, and Python scripting. Some ML experience helpful but not required.
- Access: Root/sudo on your server, and connectivity to your network's mirror port or tap for traffic capture.
Step-by-Step Guide
Step 1: Assess the Limits of Your Current Signature-Based Approach
Before upgrading, understand why signature-only detection fails. Signatures excel at known threats—like a SQL injection pattern or a Metasploit payload—but they miss variants, zero-days, and encrypted attacks. Also, they generate high false positives when normal traffic slightly deviates from the rule. To quantify this, review your alert logs: how many alerts are false positives? How many true positives were missed? This baseline justifies the transition.
Action: Export three months of Snort alerts. Categorize them by rule ID and manually verify a random 10% sample. Note the false positive rate and any incidents missed. This will serve as your comparison metric later.
Step 2: Set Up a Robust Signature-Based Foundation with Snort
You'll build upon Snort 3, which already supports plugins. Install it from source or official packages, configure your network interfaces in promiscuous mode, and apply the latest community rules. Test with a known attack (e.g., a simple port scan) to confirm detection.
Key Configuration:
- Edit
snort.luato enablebarnyard2for logging. - Set
rules = [[include $RULE_PATH/local.rules]]plus community rules. - Deploy to your production environment (or a mirror) and collect traffic for 48 hours to serve as baseline data for later AI training.
This step ensures your AI enhancement runs alongside a working IDS, not replacing it.
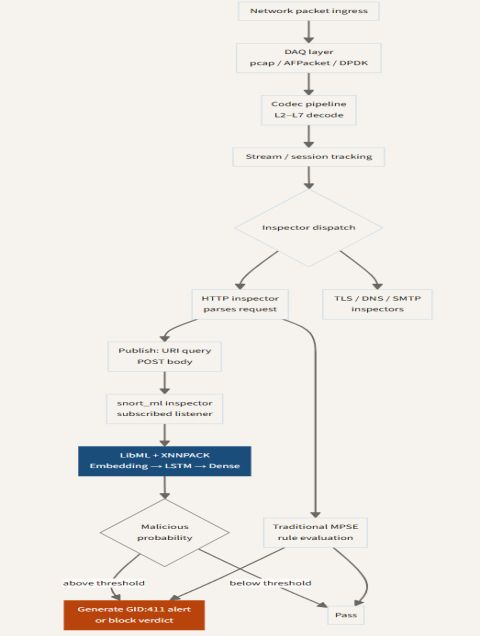
Step 3: Train a Machine Learning Model with SnortML
SnortML is a plugin that adds anomaly detection to Snort feeds. You'll train a model on your baseline traffic (normal) and on known malicious pcap files. Use a simple autoencoder or random forest classifier.
Procedure:
- Install SnortML:
git clone https://github.com/snortml/snortmland run./install.sh. - Prepare your training data: convert pcap files to
.csvusingtshark -r traffic.pcap -T fields ...focusing on features like packet length, protocol, ports, flags, and inter-arrival times. - Label each row: 0 for normal traffic from Step 2, 1 for malicious from your captured attacks.
- Train the model:
python train.py --input train.csv --model autoencoder. This will generate amodel.h5file. - Integrate into Snort: add
load_module snortml.soandsnortml { model_path=/path/to/model.h5 }to yoursnort.lua.
The model will output an anomaly score for each packet. Snort can then treat high scores as alerts (e.g., score >0.9).
Step 4: Deploy Agentic AI for Autonomous Contextual Analysis and Response
Now add an agentic layer that interprets Snort alerts (signatures and ML anomalies) in context. The agent can query external threat intelligence, correlate events across time, and even block traffic dynamically.
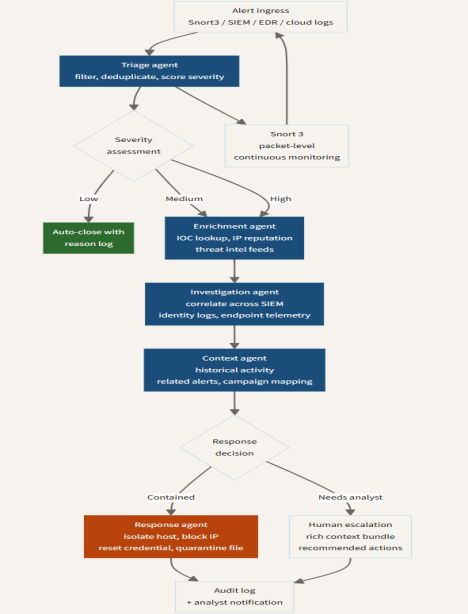
Implementation:
- Install an agent framework like LangChain:
pip install langchain langchain-openai(or use a local LLM like Llama). - Create a Python service that subscribes to Snort's alert output (e.g., Unix socket). For each incoming alert, the agent fetches related logs, checks if the destination IP is a known server, and queries a threat feed.
- The agent decides: if confidence is high and context supports an attack, it executes an action—update firewall rule via API, or send a notification. If confidence is low, it may escalate to a human.
- Test with a simulated attack: the agent should not only detect but also trace the attacker's steps and suggest remediation.
This autonomous reasoning shifts detection from static to adaptive, reducing false positives because the agent knows whether the traffic "makes sense in context".
Step 5: Iterate, Tune, and Validate
Deploy this hybrid IDS in a staging environment first. Monitor for a week, then compare with your baseline from Step 1. Metrics to track: detection rate of known attacks, false positive rate, latency, and system resource usage.
Tuning tips:
- Retrain the ML model monthly with new traffic samples.
- Adjust agent thresholds (e.g., require two correlated anomalies before blocking).
- Add a feedback loop: the agent can retrain the model on confirmed false positives to reduce them.
Once satisfied, roll out to production gradually, starting with alert-only mode before enabling automated blocking.
Tips for Success
- Start small: Don't try to incorporate every feature at once. Begin with one ML model per protocol (e.g., HTTP only) to avoid overwhelming your system.
- Maintain explainability: Both SnortML and your agent should output reasons for each alert. This helps you trust the AI and fine-tune it.
- Secure the AI pipeline: An attacker could poison your training data. Use checksums and restrict write access to your training datasets.
- Combine with log analysis: Feed IDS alerts into a SIEM (like Wazuh) to correlate with host-level events. The agent can use that context as well.
- Plan for fallback: If the ML or agent crashes, ensure Snort continues with signature-based detection. Use a watchdog script to monitor.
- Document everything: Your new system is dynamic; record model versions, agent rules, and tuning history to troubleshoot later.
By following these steps, you transform your IDS from a passive pattern matcher into an intelligent, context-aware security sentinel. The combination of SnortML's anomaly detection and agentic AI's reasoning allows you to answer the critical question: "Does this actually make sense in context?"—and act on it in real time.
Related Articles
- Defending Against IoT Botnet Threats: A Comprehensive Guide Inspired by the Aisuru-Kimwolf Takedown
- How to Implement a Defense-in-Depth Security Architecture for Agentic Workflows in CI/CD Pipelines
- 10 Things You Need to Know About the Fitbit Air Teaser
- Southwest Airlines Automates Endpoint Management: 7 Key Insights
- ClawRunr: The Open-Source Java AI Agent for Automated Background Tasks
- Google Search's AI Overhaul: End of an Era for Links and Publishers
- Kickstart Your Personalization Strategy: A Step-by-Step Prepersonalization Workshop Guide
- 10 Essential Insights for Validating Non-Deterministic Agent Behavior